by
Esther Mar
| Aug 29, 2018
Flatness can be a confusing subject. People know when they see a shape condition that will give them trouble but they sometimes don’t describe it accurately and often don’t specify their requirement in a meaningful way. The industry uses terms such as commercial flat, half standard, flatness critical, restricted flatness or panel flat but these terms are vague. ASTM standard specifications contain flatness tolerances that are only based on maximum deviation from a horizontal flat surface, although they do refer to two alternative methods for flatness determination, I-Units and % Steepness, contained in ASTM A1030.
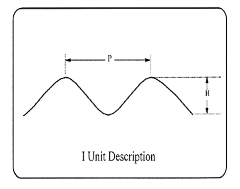
I-Units is an exacting quantitative flatness measurement. It is a dimensionless number that incorporates both the height (H) and peak to peak length (L, or P in the diagram below) of a repeating wave.

The formula for I-Units is as follows:
I = [(3.1415 x H)/2L]2 x 105
Simplified, I = 2.467[H/L]2 x 105
For example: a sheet with a 1/16” high wave which repeats every 12” would have an I-Unit value of 6.7.
There are several charts on the internet that provide the calculated values for a given H and L.